Home made Fettucini in Alfredo sauce with mushrooms and pulled chicken.

So I got a new toy for my birthday. I am super excited about it, verging on being super annoying to my wife. I love her dearly, and she has the patience of 15 saints when having to deal with me being excited about anything. The new toy is a Marcato Atlas pasta machine, I have five attachments and am looking forward to playing with them all. The first thing we made as an experiment was Fettucini. When making home made pasta I really do suggest searching out Italian recipes. Really do make sure that you use fresh ingredients and find good quality semolina or Durum flour they are the same thing.

Pasta

250g white flour
250g semolina or durum flour
5 eggs
1 oz water

Put flours in a bowl and make a well. Add eggs to the well and blend well with a fork. Once eggs are incorporated begin kneading with hands, add water or white flour as needed to make the dough the right consistency. The dough should not stick to your hands but should not be too dry.

If using a pasta machine you want get the dough to a thickness of about .5mm which on the marcato is a setting of 5. Cut your pasta to the specs of your machine or by hand however you want to do it!

Cook the pasta in bling salted water for 2-4 minutes depending on how thick you get your dough. Thicker dough will take longer.

Alfredo sauce.

I used Giada Delaurentis’s Alfredo recipe and added shredded chicken and mushrooms to make it a meal. I also made it a little less fatty by changing the cream to 1% milk and the butter to margarine. The sauce came out amazing and everything was delicious.

Sauce

2 1/2 cups milk separated
1/2 cup lemon juice
3/4 cup margarine
1/2 cup Parmesan cheese
Salt
Pepper preferably white
Pinch of nutmeg
Mushrooms
1 cup shredded pre cooked chicken
Fresh parsley

Pour two cups of milk and lemon juice into a large heavy saucepan and heat over medium heat. Add margarine and stir until melted. Add cheese and remaining milk to pan and stir constantly. Allow to reduce a little to thicken sauce. Add mushrooms, chicken and spices and heat until sauce is desired consistency.

Add noodles and stir to coat, serve in pasta bowls and garnish with fresh parsley.

Enjoy

Thin Crust Pizza Dough

There are so many pizza dough recipes on the internet it’s kinda ridiculous, but this recipe is the one that I have doctored to get what is my current favourite pizza dough. You can make this one a couple hours before you need it. Or you can let it slow rise in the fridge overnight. Either way it gives a nice thin crust which makes an amazing vessel for transporting pizza goodness to your highly refined pizza eating palates. There are so many choices when it comes to toppings too, so don’t be afraid to let your imagination run wild. Anyway enough gibber jabber. Here is the recipe.

Ingredients:

1 cup hot water
1 1/2 tsp sugar
2 tsp or one package yeast (I prefer traditional)
3 cups flour
2 T olive oil
1 tsp salt, preferably coarse salt

Method:

Pour the water, yeast, and sugar into a large bowl or the bowl of a stand mixer, and give it a stir. Let it sit for a couple minutes, until the yeast is activated. Once activated, add the remaining ingredients and mix with a dough hook or by hand.

When everything is combined into a ball, take out of the bowl and knead by hand until very smooth. Let rise in a warm dark place for about 1.5 hrs or until dough ball has doubled in size. Remove from bowl and roll out and stretch into desired pizza shape. Not circular tastes just as good as circular. Cover with desired toppings and bake at 450F until everything melts into golden brown deliciousness.

20130626-113251.jpg

20130626-113259.jpg

20130626-113307.jpg

Vietnamese Spring Rolls

IMG_7783

One of my last posts was a vietnamese noodle bowl, what goes better with that than spring rolls. Having never made them before. I was excited to try. They are actually fairly simple to make and kinda fun too. They are time consuming especially if you use the dried rice paper. I might suggest the frozen variety of wraps as you will not have to soak them to be able to use them. Anyway on with the spring roll.

Ingredients:

1/2 pound of ground pork, or shrimp, crab or other seafood
1 egg
1 cup chopped bean sprouts
1 small pepper julienne
400 oz of vermicelli soaked in cold water for 15 minutes and chopped
1 carrot julienne
2 green onions diced
1 t each Salt and pepper
2 T hoisin sauce
1 pkg rice paper

Method:

Combine all ingredients except rice paper in a large bowl and mix well, this can be time consuming to get a good a mix so I suggest using a stand mixer on medium speed and let it go until your happy with the mix the more thorough the mix the more consistent your final product will be.

Prepare your rice paper according to package directions, if using the dry paper be patient the longer you let them soak water up the more pliable they become. Take 2 Tbsp of the mixture and form into a sausage like roll place on the close side of the rice paper fold the left and right sides of the paper over the ends of the log and roll the package up. Place to the side, and continue rolling all your spring rolls up. You can now take some aside and freeze them for another meal.

This is the you decision part to deep fry or shallow fry the remaining. Deep frying gives a more even texture all the way around the spring roll. Shallow frying uses way less oil. If deep frying fill your pot enough so your spring rolls will be completely immersed in the oil. Try to not let the rolls touch the bottom of the pot as they may burn a lot easier. Immerse them until they are a uniform golden brown all the way around.

If shallow frying take a large non stick frying pan and coat the bottom in oil heat over medium high and start pan frying your spring rolls rotating them constantly, until they are a nice golden brown.

Serve them hot with the Vietnamese noodle bowl or as an appetizer on their own. I enjoy mine with plum sauce or Nuoc Nam sauce.

Enjoy!!!

Eye Opening, Tummy Filling, Breakfast Hash!

IMG_7767

Today was a beautiful morning on one of my days off and I decided to be adventurous…ish. For breakfast I made a hash that ended up being delicious, hurray! It was sweet, yet savoury, creamy and had bits of crispiness to offset the soft potatoes. I highly recommend trying this one. We had left over egg yolks in the fridge but no whole eggs so this is what I came up with.

Ingredients:
2 T butter
2 medium red potatoes
1/2 onion
1/2 red pepper (or whatever your favourite colour pepper is)
5 slices bacon
2-3 egg yolks

Method:
First, dice your potatoes into 1/4 inch cubes; the smaller they are the fast they will cook. Once they are cut up, warm a non-stick pan and melt the butter over medium heat. When it is warm add the potatoes and fry for a few minutes. While they are frying, cut up your bacon into little strips, if using pre cooked, crumble it right into the pan; if cooking, cut it up and then throw it in with the potatoes and cook it to your desired doneness. While the bacon is cooking dice up your onion, just a little bigger than the potatoes. When it is cut and your bacon is almost to your desired crispiness, add the onion to the pan. While the onion is cooking, dice your peppers and add to pan immediately. Allow to cook for 2-3 minutes more. Add the egg yolks and put your bread in the toaster. Stir the hash together until the egg yolks are just cooked and no longer runny. Serve warm, and enjoy the beginning to your day.

Yield: 2-3 Servings

You can use whole eggs if you like but this is a great way to use up egg yolks if you have them leftover from another recipe.

Vanilla cake Neapolitan

20130604-184721.jpg

This delicious treat was made last night; we had some leftover cupcake batter that we needed to use, and I figured a dessert Neapolitan was the way to go. So I created this decadent delight of deliciousness, how’s that for alliteration?!

The Cake

This cake recipe I found on Canadian Livings website and it is a simple cake recipe. If you have a favourite stand-by already, go ahead and use it instead, but this one will work for my grand design. Also, I added more vanilla because I enjoy vanilla flavour throughout a cake. If you don’t, the recipe calls for 1 tsp.

1-1/2 cups all purpose flour
1 cup granulated sugar
1-1/2 tsp baking powder

1/4 tsp salt
1/2 cup butter, softened
1 cup milk
2 eggs
2 tsp vanilla

In large bowl, whisk together flour, sugar, baking powder and salt. Using an electric mixer on low speed, mix in butter, milk, eggs and vanilla; beat on high speed until smooth, about 2 minutes.

Preheat oven to 350F. Using a baking sheet, and if you have one available, a Silpat mat, pour the batter into small rounds or one large sheet (depending on preference/ease) no more than 0.5 cm thick. Bake for 8-10 minutes or until a toothpick inserted into the centre comes out clean. Remove from oven and cool on a wire rack.

The Chocolate Sauce

Super simple to make your own & it only takes about 10 minutes.

1/2 cup semi sweet chocolate chips or 3oz semi-sweet chocolate work well but so does any dark chocolate.
1/2 cup milk or cream, divided
2 tsp cornstarch

Melt the chocolate in the milk over low heat, stirring constantly to blend completely. In a small bowl whisk together 2 tbsp of milk and the cornstarch, until cornstarch is dissolved. Add to the chocolate sauce. Turn up the heat to medium, and whisk the mixture together until it thickens. Allow to cool a little bit, but not too much because warm chocolate sauce on warm cake is delicious.

The Caramel Sauce

I found this recipe here: simply Recipes. It is a delicious, quick and easy way to make a great sauce using ingredients that are easy to find. You definitely need a candy thermometer to make your own caramel so make sure you have one. It doesn’t have to be the fanciest one out there, any candy thermometer will do. Also, depending on where you live in the world, candy temperatures are different; I.e. at sea level the soft ball point for sugar is 240F. In Calgary, which is 3500 ft above sea level the soft ball point is 233F. The basic formula is subtract 1F for every 500ft above sea level. This is very important as you will burn your sugar much quicker at higher altitudes.

1 cup white sugar
6 Tbsp butter
1/2 cup heavy whipping cream

First, before you begin, make sure you have everything ready to go – the cream and the butter next to the pan, ready to put in. Heat sugar on moderately high heat, in a large heavy-bottomed saucepan. As the sugar begins to melt, stir vigorously with a whisk or wooden spoon. As soon as the sugar comes to a boil, which will be 240F at sea level on your candy thermometer, stop stirring. Once all of the sugar crystals have melted (the liquid sugar should be dark amber in color), immediately add the butter to the pan. Whisk until the butter has melted. Once the butter has melted, take the pan off the heat. Count to three, then slowly add the cream to the pan, and continue to whisk to incorporate. Note than when you add the butter and the cream, the mixture will foam up a lot. Whisk until caramel sauce is smooth. Let cool in the pan for a couple minutes, then pour into a glass mason jar and let sit to cool. Store in the refrigerator. Warm before serving.

The recipe and instructions are the same as simply recipe’s so thanks to them for the info.

The Almonds

Simplest step of all: take 1/2 cup of almonds and bake on a flat baking sheet at 350F for 5-7 minutes, be careful to not burn them.

Bringing it all together!

The method at this point is ridiculously easy. Cut your shapes out of the cake, use your imagination; hearts, moons, stars, clovers, rainbows, oh wait that’s lucky charms! Either way whatever shape you like. On your plate pour a little chocolate sauce and a little caramel sauce and some toasted almonds. Place your cut out cake on top of the sauce and almonds. Layer another bit of almonds, chocolate, and caramel. Repeat, repeat and repeat again until you have what you think is enough. Serve with ice cream, vanilla bean infused whipped cream, or all by itself.

Enjoy the decadence with someone you like, love or just plain care about. That could simply be you, yourself & you…it’s that good!

A simple Rue

So I figured that I should also have posts on some basics, just in case there are some of you out there that don’t know the basics. Which is probable, because I still don’t know some of the basics. Anyway I digress, a roux. There are 2 types of Roux, a blonde or light roux, and a dark or brown roux. The difference between the two is very subtle. A blonde roux is used a lot in French cooking, in almost all white sauces. A brown roux is primarily used in Cajun cooking but can be adapted for other recipes. Both are easy to make and are the foundation to many sauces.

The purpose of a roux is to provide a fatty base for the sauce ingredients to stick to, and later become the thickener in a sauce.

The recipes are below.

BLONDE ROUX
Equal parts butter and white flour. Melt butter over medium heat in a sauce pan and add flour, whisking constantly to avoid clumping. Cook mixture for 2-3 minutes until nicely bubbling.

BROWN ROUX
Equal parts oil and white flour. Heat oil over medium heat in a sauce pan, add flour whisking constantly. Cook for 4-5 minutes or until roux turns a dark golden brown. Be very careful not to let it burn.

Now that you know the fundamental principle of a roux, you can also experiment with your own finishing techniques. Add a little of this, or a little of that and see what you come up with.

Crab Cakes

Image

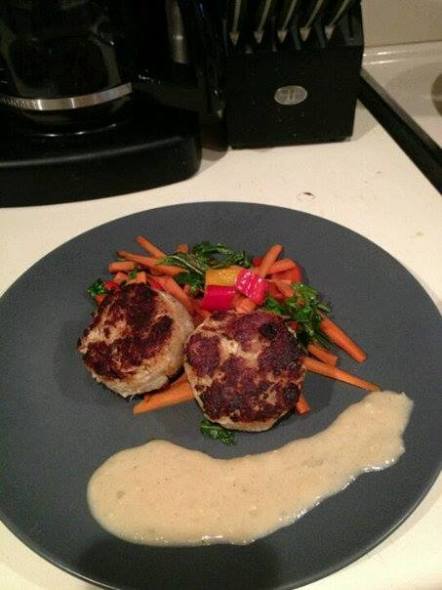
My wife and I have been experimenting with our palettes, allowing them to grow by trying different things. Living here in Calgary, it can be difficult to get good fresh seafood, and as such, crab cakes are a great fall back. Recently I made them for the first time: Blue Swimming crab cakes with a Lemon Cream Sauce and Balsamic Vegetables. All in all, pretty simple and for those of you that are interested, here is the recipe.

Crab Cakes

1/2 Yellow Onion Minced

2 Cloves Fresh Garlic

14oz crab claw meat (I used Blue Swimming crab)

2 T Mayo

3 T Lime Juice or 1 fresh lime

1/2 Cup Bread Crumbs

5 T Olive Oil

1 Egg White

Salt and Pepper to Taste

Saute the garlic and onion in a sauce pan. Once caramelized, add to a bowl with the remaining ingredients. Mix all ingredients together and form into 5 or 6, three inch patties. Don’t make them to thick or they wont warm all the way through, don’t make them to thin or they will burn easily. Set them in the refrigerator for 30 minutes to firm up. Once firm, add a little oil to sauce pan and warm on med-high. When the oil is ready, add the cakes gently and cook for about 4 minutes. Flip them gently and cook for another 4ish minutes.

Lemon Cream Sauce

1/3 cup butter

3 T flour

2 t garlic

1/2 yellow onion

1/4 cup lemon juice or juice of 1 Lemon

1/4 cup sherry or white wine

1/2 cup cream or milk

salt & pepper to taste.

Melt butter in a sauce pan add garlic and onion and saute. Once carmelized add flour. Once the rue is bubbling gently, add lemon juice and sherry and stir well. Cook the mixture down, and this is the exciting part, add the milk. It will separate, this is no problem, continue cooking the mixture until it all comes together. This takes about 5-10 min on a low temperature. Don’t rush this part. Add salt and pepper to taste. When plating, put sauce on the side as it will ruin the crust on the cakes if you drizzle it over them.

Balsamic Veg

Carrots

Sweet Peppers

Arugula

Basil

There are no amounts in this recipe because there are no rules for this. Its easy though. Once your veg is prepped, add oil to saute pan and start with carrots, about 3 minutes later add peppers. Another minute or 2 later add arugula and fresh basil. Cook until desired doneness. Drizzle balsamic vinegar on top and cook down. Serve warm and enjoy.

My wife is now in love with these and I hope you will be too. Thanks for reading!